
Spatial ATAC 操作指南

百创空间ATAC芯片demo数据下载
2025年6月17日
空间ATAC-seq技术正式上线,百创S系列芯片再升级!
2025年7月9日1. 环境配置
1.1 conda安装
wget https://repo.anaconda.com/miniconda/Miniconda3-py39_4.12.0-Linux-x86_64.sh
下载完成之后运行(按提示安装)
sh Miniconda3-py39_4.12.0-Linux-x86_64.sh
安装完成后执行以下命令
source ~/.bashrc
1.2 环境配置
conda create -n (环境名) python=3.9
激活环境:
conda activate (环境名)
添加镜像源
conda config –add channels https://mirrors.bfsu.edu.cn/anaconda/cloud/bioconda/
conda config –add channels https://mirrors.bfsu.edu.cn/anaconda/cloud/conda-forge/
conda config –add channels https://mirrors.bfsu.edu.cn/anaconda/pkgs/free/
conda config –add channels https://mirrors.bfsu.edu.cn/anaconda/pkgs/main/
查看镜像源
conda config –show channels
1.3 安装python模块
conda install numpy=1.23.4
conda install opencv=4.7.0
conda install pandas=2.2.2
conda install matplotlib=3.8.4
conda install tqdm=4.66.4
conda install seaborn=0.12.2
conda install tifffile
conda install scanpy=1.9.8
1.4 软件安装
conda install samtools=1.18 sambamba=1.0.1 bedtools=2.31.1
conda install macs2=2.2.7.1
conda install deeptools=3.5.5
conda install ucsc-bedgraphtobigwig=472
conda install bwa=0.7.17
conda install bioconda::cutadapt=5.0
conda install bioconda::ucsc-bedsort
conda install bioconda::ucsc-bedclip
1.5 安装指定R版本(v4.3)
conda install -c conda-forge r-base=4.3.1
1.6 安装指定R包
conda install -c conda-forge r-signac=1.14.0
conda install -c conda-forge r-seurat=4.3.0
conda install bioconda::bioconductor-rtracklayer=1.62.0
conda install -c conda-forge r-kableextra=1.4.0
conda install -c conda-forge r-optparse=1.7.5
conda install -c conda-forge r-this.path=2.7.0
conda install conda-forge::r-r.utils
conda install conda-forge::r-devtools=2.4.5
options(timeout = 9999999999999)
devtools::install_github(“davidsjoberg/ggsankey”)
install.packages(‘DT’)
2. 参考基因组配置
参考基因组需要使用bwa进行建库(流程使用bwa比对)
gtf文件中需包含gene_id,gene_name,gene_biotype/gene_type
人和小鼠基因组推荐使用:
https://www.10xgenomics.com/support/software/cell-ranger-arc/latest/release-notes/reference-release-notes
refdata-cellranger-arc-GRCh38-2020-A-2.0.0
refdata-cellranger-arc-mm10-2020-A-2.0.0
其他基因组可自行选择版本。
3. 配置文件填写
配置文件可参考config.txt进行填写,内容说明如下:
## fq数据路径,FQ1为read1文件路径,FQ2为read2文件路径
FQ1 /path/to/read_1.fq.gz
FQ2 /path/to/read_2.fq.gz
## 芯片解码文件路径
FLU /path/to/flu_info.txt
## 组织明场图片路径
HE /path/to/HE.tif
#INSIDE 1 #是否扣除组织内部空白区域,默认1扣除,选0为保留
## 组织荧光图片路径
#FL /path/to/FL.tif #组织荧光图,和HE图二选一
#FLC -1 #荧光图颜色通道,值为0,1或2,选择-1为自动判断
## 组织区域文件路径
JSON /path/to/roi.json #如不给定,则流程会自动使用上面的图片进行识别,自动识别建议使用荧光图
## 参考基因组文件
GenomeVer xxxx #版本信息,出现在报告中
Ref /path/to/ref/genome.fa #基因组fa文件
Gtf /path/to/ref/gene.gtf #基因组gtf文件
SPECIES human #物种文件,人和小鼠分别为human/mouse,其他物种自行给定
## 输出结果及输出文件前缀
OUTDIR /path/to/result/dir/
PREFIX outfile-prefix
## barcode 类型,S3000芯片无特殊情况为V2
BCType V2
## 线程数
Threads 8
## cs序列类型,无特殊情况为cs12
CSType cs12
4. 软件运行
在配置好的环境中,运行命令:
/path/to/BSATAC -c config.txt -s 0
其中 -c 是配置文件,-s 是所选择运行的步骤,0是全部运行
5. 结果说明
outdir/
├── 01.fastq2BcUmi # barcode识别目录
├── 02.LinkBcChip # 芯片barcode对应
├── 03.AllheStat # 多级分辨率和组织区域处理
├── 04.Cutadapt # 接头过滤
├── 05.Mapping # reads比对结果
├── 06.Fragment # Fragment分析
├── 07.WebReport # 网页版报告
├── BSTViewer_project # 收集的结果目录
└── prefix # 芯片原始barcode结果
联合分析操作指南
注意说明,当前分析需要百创智造的空间RNA和空间ATAC分析流程输出的结果!!!
空间RNA和空间ATAC的主要结果各自存储在BSTViewer_project文件下。
下面提供两种方案-方案1和方案2,优先推荐方案1,基于HE/FL缩放后的原图进行对齐,优势:
- 基于原片对齐,轮廓更清晰,减少错误对齐可能
- 减少DNA/RNA 逸散/轻微脱片等导致错误对齐可能
备注说明:
- 方案1的缩放图来自于
BSTViewer_Project文件夹下的he_roi_small.png! - 方案1也可以直接用原片(20000*20000像素的HE图和荧光图)进行对齐,电脑内存建议32Gb以上!
- 对齐用的是相对位置,所以只要保证缩放关系一致即可。
方案1 FiJi对齐(原片对齐)
step1:百创空间ATAC与空间转录组联合分析之HE图像对齐
https://live.csdn.net/v/510645
step2:百创空间转录组与空间ATAC联合分析之图像对齐后的barcode映射-CSDN博客
https://blog.csdn.net/m0_74235168/article/details/157131149?spm=1001.2014.3001.5501
step3:百创空间ATAC与空间转录组联合分析之Level1向其他level水平的点映射-CSDN博客
https://blog.csdn.net/m0_74235168/article/details/157135254?spm=1001.2014.3001.5501
方案2 FiJi对齐(L1绘制图片对齐)
百创智造空间ATAC与空间转录组联合分析之切片对齐-汇总版
https://blog.csdn.net/m0_74235168/article/details/157203989?sharetype=blogdetail&sharerId=157203989&sharerefer=PC&sharesource=m0_74235168&spm=1011.2480.3001.8118
百创空间ATAC与空间转录组联合分析之HE图像对齐-视频版
https://live.csdn.net/v/510645
其它: Fiji的下载与安装(windows 10)
https://zhuanlan.zhihu.com/p/18027378723
特殊说明:软文详细讲解了对齐的原理,脚本实现以及结果说明。其中,软文中涉及的脚本存在 [SpatialATAC/v1.0.2/fragment/ImageJ_FJ] 中。
2. 联合分析
2.1 配置文件说明
配置文件可参考config.txt [SpatialATAC/v*/fragment/Joint_analysis/v*/] 进行填写,内容说明如下:
##ATAC和RNA分析路径(一级目录下)
ATAC_analysis path/BSTViewer_project/
RNA_analysis path/BSTViewer_project/
######映射文件(通过Image Fiji获取)(默认读取L18 L9 L7 L5四个水平的结果)
Fiji path/
##输出路径
outdir path/analysis
##其它参数
alpha 0.1 ##透明度,范围是0-1
logfc 0.1
2.2 流程执行
perl Joint_main_v1.2.pl -c config.txt -s 0
其中 -a -b -c 是配置文件,-s 是所选择运行的步骤,0是全部运行
perl Joint_main_v1.2.pl
Usage:
-a spatial config ##空间转录组主流程的配置文件
-b atac config ##空间ATAC主流程的配置文件
-c joint config ##联合分析的配置文件(见2.1)
-s run step
step number:
0: run all step
1: Joint analysis
2: Joint report
3: total report
2.3 结果说明
analysis/
├── L*_alignment
│ ├── L*_CoveragePlot.pdf ##基因组浏览器图
│ ├── L*_CoveragePlot.png
│ ├── L*_heatmap.pdf ##marker基因热图
│ ├── L*_heatmap.png
│ ├── L*_Joint_marker_gene.csv ##联合分析marker基因
│ ├── L*_joint.rds ##rds文件
│ ├── L*_Sankey_plots.pdf ##桑基图
│ ├── L*_Sankey_plots.png
│ ├── L*_Spatial_ATAC.cluster.pdf ##ATAC聚类图
│ ├── L*_Spatial_ATAC.cluster.png
│ ├── L*_Spatial_Joint.cluster.pdf ##联合分析聚类图
│ ├── L*_Spatial_Joint.cluster.png
│ ├── L*_Spatial_RNA.cluster.pdf ##RNA聚类图
│ └── L*_Spatial_RNA.cluster.png
├── Readme.txt ##说明文档
└── report
├── Joint.html ##联合分析报告
├── Spatial_ATAC_Joint.report.html ##空转/ATAC和联合分析汇总报告
└── src
**特殊说明**
1. L*_joint.rds 中存在3个assay,分别是:ATAC(peak矩阵),Spatial(表达矩阵),RNA(活性矩阵)。
2. 结果生成2个报告:联合分析的报告,以及Spatial、ATAC以及联合分析的汇总报告
3. 细胞分割分析
3.1 流程执行
脚本存储在[v*/Cell_Split/ATAC_CellSplit_v1.3.pl]
perl ATAC_CellSplit_v1.3.pl
Description:
Version:v1.3
Usage:
-a <RNA analysis directory> must be given ##空转流程结果路径
-b <ATAC analysis directory> must be given ##ATAC流程结果路径
-ra L1_ATAC-RNA_barcode_relations_ALL.csv must be given ##L1 barcode映射关系(通过FIJI图像对齐获取)
-o <outdir> must be given ##输出路径
-s mouse/human/other must be given ##物种选择
-g gtf/gff must be provided if -s is not mouse/human ##非人和鼠物种gtf提供
-h Help document
3.2 结果说明
CellSplit/
├── ATAC_cluster.csv ##ATAC细胞分割水平聚类结果
├── Cell.fragments.tsv.gz ##细胞分割水平fragment文件
├── Cell.fragments.tsv.gz.tbi
├── Cell_matrix ##细胞分割水平矩阵
│ ├── bins_5000
│ ├── bins_5000.barcodes.tsv
│ ├── bins_5000.matrix.mtx
│ ├── bins_5000.peak
│ └── matrix
│ ├── barcodes.tsv.gz
│ ├── features.tsv.gz
│ └── matrix.mtx.gz
├── Cell_Signac ##细胞分割水平Signac分析,和常规的Level水平分析类似
│ ├── ATAC-Fragment_Size_Distribution.pdf
│ ├── ATAC-Fragment_Size_Distribution.png
│ ├── ATAC-TSS_by_Unique_Frags.pdf
│ ├── ATAC-TSS_by_Unique_Frags.png
│ ├── DimPlot_bin.0.0.0.8.pdf
│ ├── DimPlot_bin.0.0.0.8.png
│ ├── DimPlot_bin.0.0.1.2.pdf
│ ├── DimPlot_bin.0.0.1.2.png
│ ├── DimPlot_bin.0.0.1.5.pdf
│ ├── DimPlot_bin.0.0.1.5.png
│ ├── matrix
│ │ ├── barcodes_pos.tsv.gz
│ │ ├── barcodes.tsv.gz
│ │ ├── features.tsv.gz
│ │ └── matrix.mtx.gz
│ ├── object.rds
│ ├── QC_Vlnplot.0.0.pdf
│ ├── QC_Vlnplot.0.0.png
│ ├── Quantiles_DensityScatter.0.0.pdf
│ ├── Quantiles_DensityScatter.0.0.png
│ ├── Spatial_pos_cluster.0.0.0.8.pdf
│ ├── Spatial_pos_cluster.0.0.0.8.png
│ ├── Spatial_pos_cluster.0.0.1.2.pdf
│ ├── Spatial_pos_cluster.0.0.1.2.png
│ ├── Spatial_pos_cluster.0.0.1.5.pdf
│ └── Spatial_pos_cluster.0.0.1.5.png
├── CellSplit.L1_Cell.xls
├── CellSplit.L1.xls
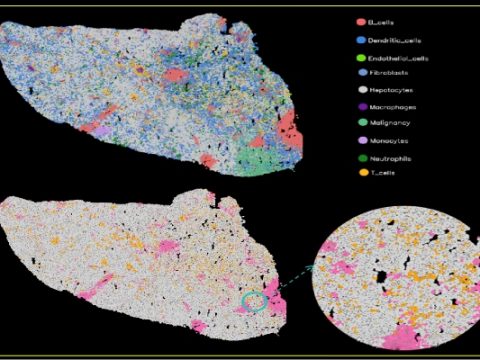
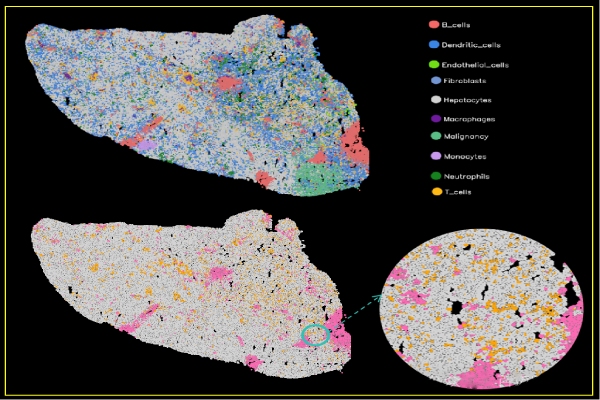
├── ClusterPlot ##细胞分割水平回溯图
│ ├── ATAC.cell_cluster_color_outline_img.tif
│ ├── ATAC.cell_cluster_with_legend_img.tif
│ ├── clusters_colors.npy
│ ├── colors.npy
│ ├── Joint.cell_cluster_color_outline_img.tif
│ ├── Joint.cell_cluster_with_legend_img.tif
│ ├── Spatial.cell_cluster_color_outline_img.tif
│ └── Spatial.cell_cluster_with_legend_img.tif
├── Joint_CellSplit.rds ##细胞分割水平联合分析rds结果保存
├── Joint_cluster.csv ##细胞分割水平联合分析聚类结果
├── Joint_marker_gene_top10.csv ##top10的marker基因
└── Spatial_cluster.csv ##空转细胞分割水平聚类结果

